"COLOUR IS NOT INTENDED TO DESCRIBE BUT TO EVOKE." -LE CORBUSIER

Oklahoma is derived from the Choctaw Indian words "okla" meaning people and "humma" meaning red. Oklahoma is my home. Tinctoria is Latin, meaning to dye or color things; this is my work.

31 March 2010

EGGSTONES

Eggstone Platter, 2010.

The celebration of Spring is thought to be one of the oldest cultural rituals. These Spring celebrations often include dyeing eggs. Eggs are the symbol for rebirth, renewal of life and the possibility for growth. Colored eggs were offered to the goddess Easter during the Vernal Equinox. The dyed eggs were often placed on graves as a charm or symbol of rebirth. 

The word Easter is derived from the ancient word “eastre”, meaning spring. The goddess Easter/Oestre celebrates the Vernal Equinox, representing the sunrise, springtime, fertility and renewal of life. The Vernal Equinox is the transition from the dormancy of Winter to the life giving fertile season of Spring. 

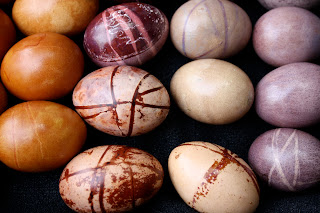
Eggstones, various colors, 2009.

Dyeing eggs is a fun activity. Each egg is unpredictable in its own marks, mottles, smears, lines and spots (thank you chickens) which are further enhanced by our intentional and serendipitous marks. Natural dyes create a harmonious palette, complimenting any Spring celebration. Most natural dyes used to color eggs are common pantry ingredients, including spices, foods, wines, flowers, and teas. Dyeing eggs during Spring is festive, cheerful and colorful! 

Grid of Colored Eggs, 2009.

Common Easter egg dye is a form of synthetic food coloring. The chemical that does the dyeing is a molecule which gives the dye its color and bonds it to the eggshell. These now “traditional” egg dyes are rather garish in their colors. But, using natural sources to dye eggs offers many color possibilities and combinations.

Logwood and Red Wine Eggstones, 2009.

Logwood purple, fustic and quebracho red are tree sources, imparting soft or strong purples, golden yellow brown and pastel pink respectively. Cochineal is the time honored red dye derived from cochineal insects but on eggs creates a pale pink or a deep eggplant. Derived from the roots of the madder plant, eggs dye a deep brown with a reddish cast. Pomegranate is derived from the rinds of pomegranate fruits, casting an olive hint in its yellow hue. Green tea makes a clear light lemon yellow and black tea is deceivingly wood like in its appearance. Red cabbage transitions to various shades of blue in a cold soak. Coffee makes a light mocha and chamomile tea a lovely tan. Red wine's mysterious crystalizing effect adds sparkle. Turmeric and curry create a range of mellow yellows. Double dipping creates very unusual colors. 

Eggstones (cochineal, logwood), 2008.

Various egg preparations expand the range of color from a single dye. Wash and rinse eggs well to remove any oils and residues. For long term use, either blow out the eggs or hard boil for a minimum of two hours. Allow the hard boiled eggs to continue to “dry out” after they are dyed. Eventually, you will be able to gently shake the egg and hear the dried yolk inside. Eggs can be boiled in water or in a water/white vinegar solution. Vinegar removes the outer membrane of the egg, giving some dyes a dramatic color shift, such as cochineal & logwood purple. Let the eggs cool in the pan, gently extract and rinse, and place on a towel to air dry. Make sure not to change temperatures suddenly. 

Shibori Eggstones, 2009.

Some mark making supplies include rubber bands, nylon stockings for holding  things in place, electrical or masking tape, beeswax & tjaunting tool, crayons, lace, fresh grasses, flowers and leaves or whatever else you can think of. Additional color variations can be achieved by varying  the dyeing time. When an egg is placed in a dye solution, the dye bonds itself to the eggshell. When the dye is more concentrated or the egg is left to soak for a longer time, more dye bonds to the egg, resulting in a deeper color. Dyeing eggs with natural dyes usually requires extended soaking times.

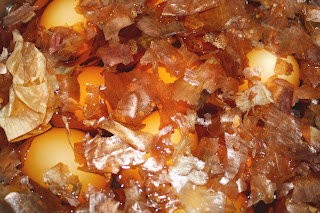
Onion Skins boiling with eggs, 2010.

Some dyestuffs require boiling such as brazilwood, red cabbage or onion skins. Generally, boil the dye stuff material about thirty minutes and allow to cool. Either strain the liquid or leave dye stuff in the bowl and place eggs in the container. The cold dip method is convenient for extended soaking times. Gently lift eggs out of bowl with slotted spoon, tap dry with a towel so the dye does not “pull” on the drying rack, leaving a ring at the base of the egg. Some dyes may rub off more easily than others. 

Boiled Red Cabbage, 2009.

Once the eggs are thoroughly dry they can be brushed with mineral oil. I love this process because the mineral oil brings out the natural colors and imparts a lovely sheen to the egg. For me this is the point when the eggs transition to EGGSTONES. They become even more mystical in their various shapes and color. 

Eggstones, 2009.

Mineral oil does not go rancid like vegetable oils. But, I have applied mineral oil to freshly hard-boiled eggs only to discover the mineral oil blistering because the egg was still sweating; so be sure the eggs are thoroughly dried before applying it. The natural colored eggs can be stored in paper egg cartons in a cool, dark place. Eggs will continue drying so it is important not to store them in plastic. 

Blue Speckled Egg (red cabbage), 2009.

Blues: Red Cabbage Leaves (boiled & cooled), Purple Grape Juice
Browns & Beige & Mocha: Strong Coffee (light mocha), Instant Coffee, Black Walnut Shells (boiled), Black Tea Leaves, Dill Seeds, Chili Powder, Chamomile Tea (lovely tan)
Greenish Yellow: Spinach Leaves (boiled), Liquid Chlorophyll
Grays and Lavender: Purple or red grape juice or beet juice, Red Wine (sit 24 hours-forms crystals), logwood purple
Orange Browns: Yellow Onion Skins (boiled), Carrots, Paprika, Madder Extract (deep chocolate w/vinegar eggs), Fustic liquid extract or shavings
Pink & Reds: Madder Root (long, slow cook), Beets, Juice from Pickled Beets, Quebracho Red Natural extract (soft pink), Cochineal (pale pink with baking soda), Brazilwood shavings
Violets & Purples & Eggplant: Red Onions Skins (boiled), Cochineal (distilled water, eggs boiled in water/vinegar), Logwood purple extract (deeper w/vinegar eggs)
Yellows: Carrot Tops (boiled), Green Tea (light lemon yellow), Ground Turmeric & Curry powder, Saffron, Marigolds, Pomegranate extract(olive cast).

Light Value Eggstones, 2009.

Egg & Nest is a beautiful book full of the unique marks that birds make on their own eggs:
Purcell, Rosamond, Hall, Linnea S., Corado, Rene. Egg & Nest. Belknap Press of Harvard, University Press, 2008.

Madder and Onion Skin Eggstones, 2010.

25 March 2010

Spring into Green

Flowering Allium, 2009.

Green is the ultimate color celebrating Spring. During Spring, the color literally springs us into action when it seems all of the plant kingdom is awakening from either a deep sleep or a confusing winter season. Yet, during those sometime long Winter months, we are surrounded by evergreens such as junipers, pines and hollies. Evergreens offer up color we would otherwise be starved for in the depths of winter. Overall, Green’s strongest connection is new life symbolized in the Vernal Equinox recently celebrated 20 March 2010.

Helleborous, 2009.


Green is one of the three secondary colors on the color wheel. It lies between Blue and Yellow. Green morphs the triangle (yellow) and the sphere (blue) forming its own balance between these two primary colors. The green wavelength lies in the middle of the light spectrum, making a transition between warm and cool colors, the fast wavelengths and the slow ones respectively.

Energyscape #3012, 2009.

The heart chakra is associated with Green. The heart represents issues of giving and receiving love, finding balance and harnessing the imagination. Green is compassion, hence its association with our ecological crisis; the conflict between being “green” and pretending to be by “green-washing”. Its element is wood. 

Determination, 2009.

Green is derived from vertigris or copper. The patina of copper is a distinctive green-gray, developing over centuries. Copper as an afterbath or simply steeping fiber in a copper pot pulls out the “green” in yellow plant dyes. 

Yellow Veins, Cornell Botanical Gardens, 2009.

Visually, green is the most abundant color but when it comes to natural dyes it often requires a two step combination of yellow and indigo. The value and intensity of the yellow in combination with the depth of indigo will determine the resulting green. Consider the warmth or coolness of the yellow dye which is being used. Traditionally fustic is a warm yellow and weld is a cool yellow. With the use of local yellows and indigo, the range of Greens can become customized and Place specific.

Chalet Oklahoma, 2009.

Green represents life and ecology. Its qualities are closely associated with herbs, foods and medicines and anything harmonic. The color relates brightness, as in Spring, or dullness, as in sage which is a melodramatic color associated with wisdom. 

Tower of Ivy, Ithaca, 2009.

descriptive words for green:
sage, celadon, olive, bottle green, cerulean, sea green, mint, deep in the woods, meadows, olive, chlorophyl, copper, verdi, vernal, juniper

Green Paving, Hot Springs, 2009.

green inspirations:
green apples, moss, wheat grass, sprouts, herbs, rosemary, sage, thyme, oregano, mint, peas, holly, evergreens, limes, malachite, spring shoots, fern fronds, salad greens, mesclum mix, pistachios, forests, grass, jade, emerald, green grapes, leaves, olives, herbaceous plants, green eggs, green onions, green tomatoes, parsley, cilantro, spinach, arugula, lettuce and kale.

green represents:
life, freshness, harmony, welcome, neutrality, calmness, relaxation, balance, health, growth, vitality, good fortune, healing, spiritual, peace, tranquility, wholeness, brightness, optimistic, fruitfulness, contentment, tranquility, hope, fusion and an appreciation of natural eco-systems.

Mixed Moss Species, 2008.


17 March 2010

Notes on Dyeing the Blues

Sky and Moon, Oklahoma, 2009.

Dyeing with Indigo is an art, a science, a skill and it is magical.
Blue is rare in the natural world except for our expansive sky and reflective water. There are not even very many blue flowers. Indigo is the only natural blue dye. Indigo plants inhabit every continent, making it one of the oldest natural colorants in continual use. Because of its extensive geographic accessibility, many cultures have developed their own practices for growing and extracting these valuable and desirable blues. 

Close up of Indigo Dyed & Over-dyed Yarns.
Heather Clark Hilliard, City Arts Center.
'Dyeing the Blues' Workshop, 2010.

The process of extracting and dyeing with indigo is mysterious and complex. In fact, the plant leaves from which the blue color is extracted do not show any indication of “holding” the valuable blue dye called indigotin. Indigo has been in use since at least 2000 B.C. but it was not until the late 1700’s that indigo’s chemistry was beginning to be unraveled. Although we are able to explain the chemistry of indigo in modern scientific terms, it still possess elusive behavior and captures our imaginations.

Fresh Polygonum Leaves, 2009.
'Dyeing from the Garden' Workshop w/ Liesel Orend.

Indigo is a vat dye, meaning that it is only soluble in an alkaline liquid and the dye is fixed on the fiber by oxidation. Therefore, indigo also does not require a mordant. There is a colorless substance in indigo bearing plants which is called glucoside or indican. The indican is released from the plant material when the leaves are crushed and covered with water. Once bacterial enzymes develop, they consume the indican/glucoside, leaving behind indoxyl or indigotin. Indigo is a very light-fast and wash-fast natural dye source.

Indigotin is the insoluble form of indigo. This is the form of indigo that is marketed and sold. Indigo vats can be made from fresh leaves if one grows their own indigo plants. Rita Buchanan’s book A Dyer’s Garden: From Plant to Pot, Growing Dyes for Natural Fibers gives instructions for growing and dyeing with the fresh leaves of Indigofera suffruticosa (p.104), Polygonum tinctorium (p.106), and Isatis tinctoria (p.108).


Fresh Leaf Indigo Bath, 2009.
'Dyeing from the Garden' Workshop w/ Liesel Orend.

The quality of the indigo growing and production determines the quality of the dye. Some indigo may contain a high percentage of impurities, diminishing the valuable blue dye.

Making indigo soluble in water requires alkalinity and the reduction of oxygen. This can be a chemical process or it can be a natural process. Indigo White refers to the stage in the dyeing process when the insoluble indigo has been made soluble. When the indigo bath turns the decidedly beautiful green/yellow color, the indication that the vat has been properly reduced of oxygen, and the alkalinity and temperature are appropriate for the kind of fiber being dyed, then the dyer may proceed, gently submerging their cloth, dyeing to the desired depths of blue. 

Indigo Dyed & Over-Dyed Skeinlettes
Heather Clark Hilliard, City Arts Center. 
'Dyeing the Blues' Workshop, 2010.

There are many plant species containing indican that vary in geographic locations and growing conditions. The indican-bearing plant species range from small trees to shrubs to biennials or annuals. They are represented by several plant families: Leguminosae, Cruciferae, Apocynaceae, Polygonaceae, Acanthaceae-Acanthoideae, Papilionoideae, Asclepiadaceae, and American Eupatorieae. The following plant species are the most common for indigo dyeing and most of them are currently cultivated. 

Polygonum tinctorium (dyer's knotweed) is in the buckwheat family and is cultivated in Japan.
Indigofera tinctoria or tinctorium is a legume and grown mostly in India.
Indigofera suffruticosa is grown mostly in the Americas.
Indigofera guatemalensis is grown in Guatemala and possibly other Central American countries.
Isatis tinctoria (woad) is a biennial  and grown in Europe, especially France.
Lonchocarpus cyanescens or Philenoptera cyanescens is used in West Africa.
Nerium tinctorium or Wrightia tinctoria is an oleander and used in India and Southeast Asia.
 
In recent years there has been a resurgence in the cultivation and use of indigo. Growing Indigofera genus is good for the soil; many of the cultivated indigo plants are legumes which add nitrogen back to the soil instead of depleting it. The subtle colors of natural indigo cannot be duplicated by synthetic indigo, therefore there is a desire among artisans to continue to use natural indigo. There is an art, science and skill to growing indigo plants which is not only imperative but also beneficial to preserve. The article “Ai-shi, Japan’s Indigo Masters” by Rowland Ricketts, III in Shuttle Spindle & Dyepot Winter 2000/01, p.25-29 discusses in detail the Japanese methods of growing and producing indigo from Polygonum tinctorium. 


Indigo Shibori with Painting, sample on cotton.
Earth Pigments Workshop w/ John Marshall, 2009.


Dorothy Miller introduced Polygonum tinctorium into the US. The excellent book Indigo From Seed to Dye remains a valued resource about indigo history, cultivation and artisan dyeing methods.


There are many recipes for dyeing with indigo. The following  article in HAND/EYE, “Get blue at home: do it yourself indigo” is about Earthues' process for making an Indigo Stock Solution and preparing an Indigo Vat:

Additional Bibliographic and Information Resources about Indigo:


The article “Close Call”, published in 'Turkey Red Journal', by John Marshall, is about saving the production of Indigo in Japan:


INDIGO, Jenny Balfour-Paul, Archetype Books, 2007. 

Visual article about Jenny Balfour-Paul from Inspired Magazine:

SPINDIGO: the sustainable production of plant derived indigo

Woad Production and Products:


03 March 2010

Safety Bits


Miscellaneous Stir Sticks, 2010
There are many smart people doing many stupid things when it comes to safety in the dye studio. Its easy to be lazy, to think “oh, just this little bit does not matter” and all of us know that old habits are hard to break. Those old habits are not only hard to change but they are difficult to recognize and re-evaluate. The change may be as simple as rearranging your workspace or it may be more complicated like to stop drinking tea or coffee while you work (like that’s going to happen). But with some subtle and not so subtle reminders all us can make our dyeing practices safer, even if it is one little step at a time.


Dye Pot Lids & Rings, 2010

BASIC SHOULD AND SHOULD NOTS:

DO NOT USE KITCHEN EQUIPMENT OR UTENSILS.

If you are pregnant or breast-feeding, relax, take a break, day dream about your colors, do not dye.

DO NOT USE KITCHEN EQUIPMENT OR UTENSILS.

Do not eat or smoke while working.

DO NOT USE KITCHEN EQUIPMENT OR UTENSILS.

Do not drink while working. It is very easy to accidently pick up the wrong container. Also, spills happen quickly and foolishly. 

DO NOT USE KITCHEN EQUIPMENT OR UTENSILS.

Read all the labels carefully. This is your initial indication if a material is toxic or hazardous in any way. Make sure every container and product is labeled. You may know what it is but another person in your studio does not.

DO NOT USE KITCHEN EQUIPMENT OR UTENSILS.

Tidy up at the end of each work session. I  know, who can be bothered? But, be bothered! It is important to seal containers, put things away.  Make sure anything that is potentially dangerous is properly stored and out of reach from little persons and fuzzy creatures that may live with you. Be a good studio-keeper even if you can’t be bothered to be a good house-keeper.

DO NOT USE KITCHEN EQUIPMENT OR UTENSILS.

Dye Drawer Stuff, 2010

Ideally our work spaces are separate from our living spaces. If your studio is in your home consider what it is that you are doing in that space and set up your studio carefully. Is there a better place you can do specific studio activities? For example, mixing dyes in an enclosed box or heating  dye pots outside and not on the kitchen stovetop because we SHOULD NOT  BE USING KITCHEN EQUIPMENT OR UTENSILS.

Use a HEPA vacuum or a wet vac to vacuum dust and dirt. This prevents the dust from becoming airborne again.

DO NOT USE KITCHEN EQUIPMENT OR UTENSILS.

WEAR protective clothing: gloves, goggles, respirators and aprons when necessary. Turns out you have to have it on your body to protect yourself. Put those gloves on your hands.

Dye Gloves, all sorts and sizes, 2010

DO NOT USE KITCHEN EQUIPMENT OR UTENSILS.

Wear work clothes and wash them separately from your other clothes.

DO NOT USE KITCHEN EQUIPMENT OR UTENSILS. 
Know potential exposure hazards and first aid treatments for those exposures.

DO NOT USE KITCHEN EQUIPMENT OR UTENSILS. NO EXCEPTIONS.

Dye Pots and Bucket, 2010

KNOW YOUR MATERIALS
  • Choose the safest materials to use for your artwork. Find substitutes for  toxic or hazardous materials.

  • Collect MSDS reports for each chemical you use in your studio. These are extremely valuable references that are available from the manufacturer and often from the supplier. Learn how to read them. Find them online: http://www.ilpi.com/msds/

  • Read labels and instructions for the products that you use. Ask the supplier for safety information and precautions that should be taken. 

  • Inventory your materials.

  • Any substance being treated as a health hazard should be treated as a fire hazard as well.

  • Know the shelf life of your materials. How does the shelf life change once the material is mixed with other chemicals or with water?
  • Follow safe storage guidelines for flammable or toxic chemicals.

  • Properly dispose of  chemicals or materials once you are finished using them. If dye baths are acid or alkaline, neutralize them before disposal. 

  • Use adequate ventilation. There are two kinds of ventilation: dilute and local exhaust systems. Dilute means bringing clean air into the work area in order to dilute the contaminated air. Local exhaust systems collect contaminated air and remove it from the work area. 


Acute and chronic reactions to chemical exposures can occur through ingestion, inhalation and skin contact. These exposures can occur in five forms of materials:

DUST: particles generated from handling, crushing, grinding.

MIST: droplets airborne through boiling, bubbling, spraying, splashing and agitation.

FUMES: small, solid particles formed by a chemical reaction like oxidation.

VAPORS: gaseous forms of substances which are normally in liquid or solid states: changed to vapors by increases in pressure or decreases in temperature.

GASES: compressible formless fluids that can occupy a space or enclosure

*Shortened and adapted from National Institute for Occupational Safety and Health. Industrial Environment, Its Evaluation and Control. (Washington D.C. : US Government Printing Office 1973).

Not all of these may apply to your work but it is good to have a clear understanding of all of them so you recognize them. Remember, the smaller the particle the deeper into the lungs the material will go.

CONTACTS, REGULATIONS AND READING

Local Department of Environmental Quality
Local Fire Department
Local Poison Control
Local Department of Labor for Occupational Safety and Health Administration (OSHA) guidelines.

Art Hazards: Internet and Library Resources:

Monona Rossol/ Arts, Craft and Theater Safety (A.C.T.S.):
Environmental Protection Health and Safety (EPHA) Art Safety:

Clark, Nancy, Thomas Cutter and Jean-Ann McGrane. Ventilation: A Practical Guide for Artists, Craftspeople, and Others in the Arts. Nick Lyon Books, originally published Center for Occupational Hazards, New York, 1984.

McCann, Michael. Health Hazards Manual for Artists. Lyons Press, New York.

Rossol, Monona. The Artist’s Complete Health and Safety Guide. 2nd edition. Allworth Press copublished with American Council for the Arts, New York, 1994.

Rossol, Monona. “Accent On Safety”, Shuttle Spindle & Dyepot.
#86 Spring 1991, p.36-37.
#87 Summer 1991, p. 30-31.
#88 Fall 1991, p. 20-21.
#89 Winter 1991, p. 56-58.